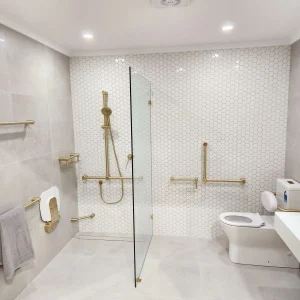
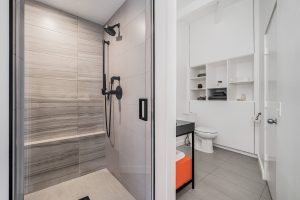
Most people want to stay in their own homes as they get older, and the bathroom is usually the room that decides whether that’s possible. It has hard surfaces, wet floors, low toilets and a tub wall to climb over, all in a small space. According to the CDC, about one in four adults age 65 and older reports a fall each year, and many of those falls happen in or around the bathroom.
The good news is that an aging-in-place bathroom doesn’t have to look like a hospital room. Most of the upgrades below are invisible to guests, and many cost very little if you plan them during a remodel.
This aging-in-place bathroom checklist covers 25 upgrades in seven areas, with the real measurements we use when we build accessible bathrooms. You don’t need all 25. Use it to spot the biggest risks for the person you’re planning for, then fix those first.
How to Use This Checklist
- Walk through the bathroom with the person who uses it: Watch how they get in and out of the shower, sit on the toilet, and reach the sink. The hard moments show you where to start.
- Mark each item: Already done, needed now, or plan for later.
- Think five to ten years ahead: If a remodel is happening anyway, add the “later” items now while the walls are open; they cost far less during construction.
- Ask about an OT assessment: An occupational therapist can recommend changes specific to a person’s condition, and a good contractor will build around that plan.
Shower and Bathing
The shower or tub is the highest-risk spot in most bathrooms, so start here.
1. Remove the step over the tub wall: A standard tub wall is about 14 to 16 inches high, and stepping over it on one leg onto a wet surface is one of the most common causes of bathroom falls. Replacing the tub with a walk-in shower in the same space is usually the single most effective upgrade. Most tub-to-shower conversion projects take one to two weeks and don’t require moving walls.
2. Choose a curbless or low-threshold entry: A curbless shower has no step at all and works for walkers and wheelchairs. A low-threshold shower keeps a curb of about half an inch to two inches, which suits people who walk but have balance problems. Curbless showers need the floor recessed so water drains properly, which adds cost, especially on concrete slab foundations. Our shower remodeling services can help you choose a shower layout that fits your bathroom and accessibility needs.
3. Add a shower seat: A built-in tiled bench or a fold-down seat at about 17 to 19 inches high lets the person bathe seated. Slope a built-in bench slightly so water runs off.
4. Install a handheld showerhead on a slide bar: It lets the user rinse while seated, adjusts to any height, and makes caregiver help much easier. Place it within reach of the seat.
5. Put controls near the entry. The person should be able to turn on the water and adjust the temperature before stepping into the spray, and reach the controls from the seat.
6. Consider a walk-in tub if soaking matters: For someone who walks steadily and gets real relief from a warm soak, a walk-in tub with a door and built-in seat may be the better fit. It’s not right for everyone: you sit inside while it fills and drains, and it doesn’t work for most wheelchair users. Our comparison of a walk-in tub vs. walk-in shower walks through how to choose.
Grab Bars and Support: Grab bars are the cheapest major safety upgrade, but only if they’re installed correctly.
7. Install grab bars in the shower or tub: Place a horizontal bar on the back wall and a vertical bar near the entry, where people reach first when stepping in. ADA guidelines, which many contractors use as a guide for homes, place horizontal bars about 33 to 36 inches above the floor.
8. Install grab bars at the toilet: A bar on the side wall, and ideally behind the toilet, makes sitting down and standing up much safer. If there’s no side wall, a floor-mounted or fold-down bar works.
9. Anchor every bar into framing or blocking: A grab bar is only as strong as what it’s screwed into. It must go into wall studs or solid wood blocking, never just drywall or tile. Suction-cup bars and towel bars can’t hold body weight and shouldn’t be used for support.
10. Add blocking inside the walls for the future: If you’re remodeling, have your contractor install wood blocking behind the toilet, shower and tub walls now, even where you don’t need bars yet. It costs very little while the walls are open and lets you add bars anywhere later without tearing out tile.
Design tip: modern grab bars come in brushed nickel, matte black, brass and other finishes, and some double as towel bars or shower shelves. Matching them to your faucets keeps the bathroom from looking clinical.
Toilet Area
11. Raise the toilet to comfort height: A standard toilet seat sits about 15 inches high. A comfort-height (or “chair-height”) toilet raises it to about 17 to 19 inches, which makes sitting and standing much easier on knees and hips. A toilet swap is one of the fastest, most affordable upgrades on this list.
12. Leave clear space beside the toilet: For someone who uses a walker, or may need a wheelchair later, plan clear floor space beside the toilet for transfers. In a tight bathroom, moving the toilet a few inches or switching to a smaller vanity can open up that space.
13. Consider a bidet seat: A bidet seat with a warm-water wash and dryer helps people with limited reach, shoulder problems or arthritis stay independent. Most models need a nearby GFCI outlet, which is easy to add during a remodel.

Sink, Vanity and Storage
14. Switch to lever or touchless faucets: Round knobs are hard to grip and turn with arthritis or weak hands. Single-lever and touchless faucets can be used with a closed fist or an elbow.
15. Plan a sink that works seated, if needed: For a wheelchair user, or someone who prefers to sit, a wall-mounted or roll-under sink with open knee space, usually set about 29 to 34 inches high, lets them use the sink without reaching. Insulate or cover exposed pipes underneath to prevent burns.
16. Lower or tilt the mirror: A mirror that starts closer to the counter, or a tilting mirror, works for both seated and standing users.
17. Move storage within easy reach: Replace deep lower cabinets with pull-out drawers, keep everyday items between hip and shoulder height, and add a recessed niche in the shower so no one has to bend to the floor or reach overhead.

Floors and Space
18. Install slip-resistant flooring: Large, glossy tiles get slick when wet. Choose textured or matte porcelain, or smaller tiles such as hexagon or penny rounds, whose extra grout lines give better grip. Professional tile flooring installation also makes sure the floor is flat, so edges don’t become trip points. Skip loose bath mats, or use only ones with solid rubber backing.
19. Remove thresholds and level changes: A raised strip between the hallway and the bathroom, or a step down into a sunken tub area, is a trip hazard and a barrier for walkers. Aim for a flush transition, or at most about half an inch.
20. Create clear turning space: For a wheelchair user, plan a turning circle of about 60 inches, or a T-shaped turning area, inside the bathroom. Even for walker users, clearing space between the vanity, toilet and shower makes every movement safer. In small bathrooms, replacing a tub with a shower or choosing a smaller vanity often creates the room you need.
Doors
21. Widen the bathroom doorway: Many older bathrooms have doors only 24 to 28 inches wide. For a walker or wheelchair, aim for at least 32 inches of clear width, and 36 inches if space allows. Widening usually means reframing the opening, so it’s best done during a remodel.
22. Change how the door opens: An inward-swinging door can trap someone who falls against it, and it takes up floor space. An outward-swinging door, a pocket door or a sliding barn door frees up room and lets help get in. Replace round knobs with lever handles, which are easier to use with arthritis or full hands.

Lighting, Water and Electrical
23. Brighten the bathroom and the path to it: Aging eyes need more light and less glare. Add a wet-rated light directly over the shower or tub, bright vanity lighting on both sides of the mirror, and motion-sensor night lights on the route from the bedroom. Large rocker switches near the door are easier to find and press than small toggles.
24. Prevent scalding: Older skin burns more easily, and reaction times slow down. Install an anti-scald or thermostatic shower valve, and set the water heater to no higher than 120°F.
25. Ventilate and protect outlets; A properly sized exhaust fan vented to the outside keeps floors from staying damp and slippery and prevents mold. Make sure every outlet near water is GFCI-protected, and add an outlet near the toilet if a bidet seat is planned.
What to Do First: Priorities by Budget
You don’t have to do everything at once. Start with the changes that remove the biggest risks, then build from there.
| Level | Upgrades | Best for | Typical timing |
|---|---|---|---|
| 1. Quick safety fixes | Properly anchored grab bars (#7–9), handheld showerhead (#4), comfort-height toilet (#11), lever faucets (#14), night lights and brighter bulbs (#23), water heater at 120°F (#24) | Early balance concerns, planning ahead, tight budgets | Often a few days |
| 2. Safer bathing | Tub-to-shower conversion with a low-threshold or curbless entry (#1–2), shower seat (#3), controls near the entry (#5), slip-resistant floor (#18) | Anyone who struggles to step over a tub wall | About 1 to 2 weeks |
| 3. Full accessible remodel | Curbless roll-in shower, wider doorway (#21–22), turning space (#20), roll-under sink (#15), blocking throughout (#10), new lighting and ventilation (#23–25) | Walker and wheelchair users, long-term aging in place | Several weeks |
The smart move: if you’re already planning a bathroom remodel, add the low-cost “future” items now, especially wall blocking, a low-threshold shower, a comfort-height toilet and a wider door. They cost little during construction but are expensive to add once the tile is finished.
DIY or Hire a Pro?
Some items on this list are easy weekend fixes. Others involve plumbing, electrical or waterproofing and should be done by professionals, because mistakes can cause leaks, mold or a grab bar that fails when someone needs it most.
| Usually DIY-friendly | Best left to a professional |
|---|---|
| Night lights and brighter bulbs | Grab bars, unless you can locate studs and install blocking correctly |
| Lever faucet handles (if no plumbing changes) | Tub-to-shower conversions and curbless showers |
| Turning down the water heater | Anti-scald valves and moving shower controls |
| Rubber-backed mats and decluttering | Toilet relocation and drain changes |
| A freestanding shower chair | Widening doorways and reframing walls |
| New electrical outlets, lighting circuits and exhaust fans | |
| Waterproofing and tile for any shower |
When you hire, ask the contractor whether they anchor grab bars into blocking, how they waterproof a curbless shower, and who handles permits and licensed plumbing and electrical work. An experienced accessible bathroom remodeling team will plan the bathroom around the person who uses it, not just around the fixtures.
Make the Bathroom Work for the Years Ahead
An aging-in-place bathroom isn’t about giving up style. It’s about removing the small risks, like a high tub wall, a low toilet or a slippery floor, so the person you love can keep bathing safely and independently in their own home. Start with the items that solve today’s hardest moments, and build in the rest whenever you remodel.
Planning an accessible bathroom in the Houston area? Brito Remodel & Construction builds curbless showers, walk-in tubs and full aging-in-place bathrooms with the same custom tile and finishes we use in any high-end remodel, and every project is supervised on site by the owner. Send us a few photos of your bathroom and we’ll get back to you within 24 hours, then visit for a free, no-obligation consultation. Call (281) 736-5954, request a free estimate, or find answers to common questions in our bathroom remodeling FAQs.
Aging-in-Place Bathroom FAQs
What is an aging-in-place bathroom?
An aging-in-place bathroom is designed so a person can use it safely and independently as they get older or as their mobility changes. Common features include a curbless or low-threshold shower, grab bars anchored into the walls, a shower seat, a handheld showerhead, a comfort-height toilet, slip-resistant floors, wider doors and better lighting.
What is the most important bathroom safety upgrade for seniors?
For most people, it’s removing the step over the tub wall by replacing the tub with a low-threshold or curbless walk-in shower. Properly anchored grab bars are a close second, and they cost far less.
How high should grab bars be in a bathroom?
Horizontal grab bars are usually installed about 33 to 36 inches above the floor, following ADA guidelines. In a home, the best height also depends on the person’s height and how they move, so adjust it to the user.
What is the best toilet height for seniors?
A comfort-height toilet with a seat about 17 to 19 inches above the floor works well for most older adults. It’s taller than a standard toilet, which makes sitting and standing easier on the knees and hips.
How wide should a bathroom door be for a walker or wheelchair?
Aim for at least 32 inches of clear width, and 36 inches if possible. Many older bathroom doors are only 24 to 28 inches wide and need to be widened.
Does an aging-in-place bathroom have to meet ADA requirements?
No. ADA rules apply to public and commercial buildings, not private homes. ADA measurements are still a useful guide, and a contractor can adjust them to the person who will use the bathroom.
Can I make a bathroom safer without a full remodel?
Yes. Grab bars anchored into framing, a handheld showerhead, a comfort-height toilet, lever faucets, better lighting and a lower water heater temperature can all be done without a full renovation. Removing the tub wall or widening a doorway usually requires a remodel.
Does Medicare pay for bathroom safety modifications?
Original Medicare generally doesn’t cover home modifications like grab bars or shower conversions. Some Medicare Advantage plans and state Medicaid programs offer limited home-safety benefits, and eligible veterans may qualify for the VA’s HISA grant. Check current rules with each program.